


Using the command line in python is fine and for a lot of my sensor examples it is adequate the results show up like this but ultimately for displaying results or getting user feedback say to click on a button to switch and led on and off it is nice to build a GUI, luckily python has the tkinter module available.
In the latest version of Raspbian and i am now using Raspbian Buster this is already installed but older versions may not have it installed – we will show you an easy way to check in example 1 below.
If you do not have tkinter – you can do the following
Ensure your Raspberry Pi is connected to the Internet, open an Terminal window and enter the following command:
sudo apt-get install python-tkEnter your password if that is required and type y at any prompts that may appear
Example 1
A quick test is the following example which brings up a tkinter window that shows tkinter’s version.
[python]
import tkinter
tkinter._test()
[/python]
I started mu editor, typed in the code and ran it here is what I saw
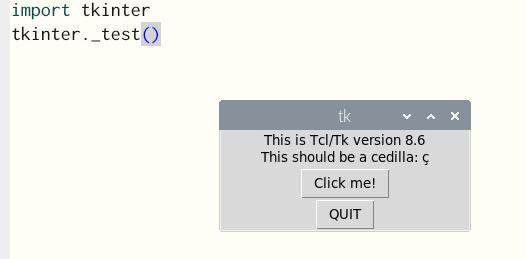
tkinter version
Example 2
Now for a more complete example, we will create a new window with a title and a button, when the button is clicked a message box will be displayed. This is a fairly common hello world type example again we used the mu editor, click on new then type in the code below and save it as any file name you want – I called mine tkintertest.py
[python]
# Write your code here 🙂
from tkinter import *
from tkinter import messagebox
# initialise main window
def init(win):
win.title(“Hello World application”)
win.minsize(500, 100)
btn.pack()
# button callback
def hello():
messagebox.showinfo(“Hello”, “Pleased to meet you!”)
# create top-level window
win = Tk()
# Gets the requested values of the height and widht.
windowWidth = win.winfo_reqwidth()
windowHeight = win.winfo_reqheight()
# Gets both half the screen width/height and window width/height
positionRight = int(win.winfo_screenwidth()/2 – windowWidth/2)
positionDown = int(win.winfo_screenheight()/2 – windowHeight/2)
# Positions the window in the center of the page.
win.geometry(“+{}+{}”.format(positionRight, positionDown))
# create a button
btn = Button(win, text=”Hello”, command=hello)
# initialise and start main loop
init(win)
mainloop()
[/python]
Click on the Run button and you should see something like this
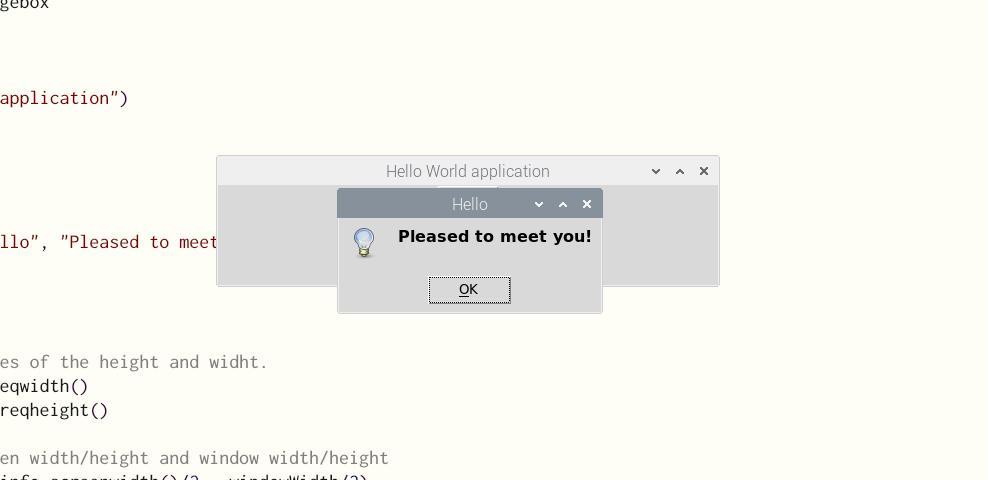
tkinter hello world
Analysis
Lets look at some of the code above
First of all we import the required tkinter modules
from tkinter import * from tkinter import messagebox
The next lines of code create a simple messagebox witha title of Hello and a text message of Pleased to meet you – this is invoked when the button is pressed
# button callback
def hello():
messagebox.showinfo("Hello", "Pleased to meet you!")
We now give the window a title and a minimum size, then we call the Tkinter pack function on behalf of our button. This adds the button to its parent window in this case the window called win.
# initialise main window
def init(win):
win.title("Hello World application")
win.minsize(500, 100)
btn.pack()
This is a piece of code I found searching the net, when I ran the example above it would start my application in stupid locations on the screen, these lines center the starting position
# Gets the requested values of the height and widht.
windowWidth = win.winfo_reqwidth()
windowHeight = win.winfo_reqheight()

# Gets both half the screen width/height and window width/height
positionRight = int(win.winfo_screenwidth()/2 - windowWidth/2)
positionDown = int(win.winfo_screenheight()/2 - windowHeight/2)

# Positions the window in the center of the page.
win.geometry("+{}+{}".format(positionRight, positionDown))
Summary
Well thats a quick example to get you started, we will have a few more examples where we control things connected to the raspberry PI GPIO and also display some sensor readings as well