


Recently I bought a DVK512 Raspberry Pi Expansion Board from Waveshare for my raspberry Pi. If you have never heard of the DVK512 the its a reasonably priced add-on (hat). The following features and image are from the Waveshare site
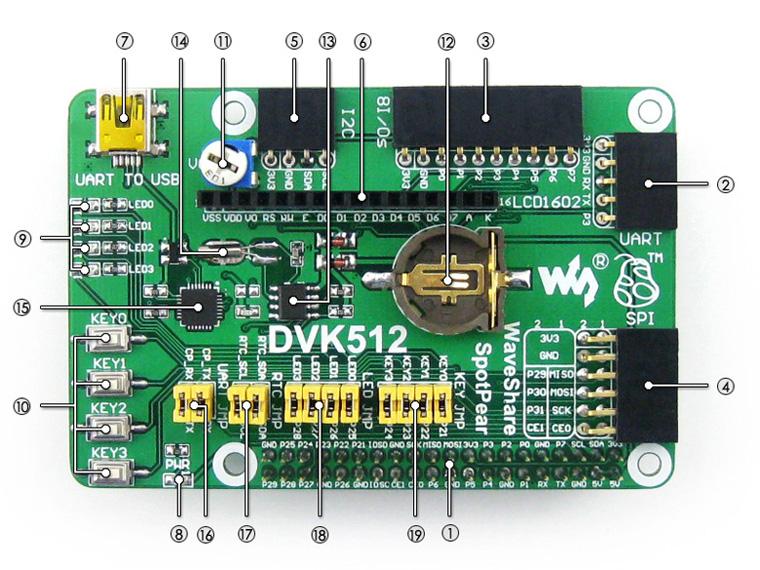
- UART interface: easily connects to UART modules such as RS232, RS485, USB TO UART, etc.
- 8I/Os interface: easily connects to modules controlled by I/Os, such as 8 Push Buttons, Logic Level Converter, Mix Board, etc.
- SPI interface: easily connects to SPI modules such as AT45DBXX Dataflash, L3G4200D Board, etc.
- I2C interface: easily connects to I2C modules such as PCF8574 Expansion Board, PCF8563 RTC Board, LSM303DLHC Board, etc.
- Character LCD interface: for connecting character LCDs like LCD1602
- USB connector: USB TO UART, supported by onboard converter CP2102
- Power indicator
- User LEDs
- User Keys
- Potentiometer: for LCD1602 contrast adjustment
- RTC battery holder
- PCF8563: onboard RTC chip
- 32.768K crystal: RTC crystal
- CP2102: onboard USB TO UART chip, for debugging
- CP2102 jumper
- RTC jumper
- User LEDs jumper
- User Keys jumper
Code Example
There are 4 LED’s on the board and Waveshare supply some code examples in Python, Shell and C
I was interested in the C options, 1 of these uses wiringPi and the other BCM2835, I was interested in wiringPi
[codesyntax lang=”cpp”]
/* blink.c
 * you can build this like:
 * gcc -Wall blink.c -o blink -lwiringPi
 * sudo ./flash
*/
#include<wiringPi.h>

char LED[]={25,26,27,28};
unsigned char i;

int main(void)
{
	wiringPiSetup();
	for(i=0;i<4;i++)
	{
		pinMode (LED[i],OUTPUT) ;
	}

	while(1)
	{
  		for(i=0;i<4;i++)
		{
  			digitalWrite (LED[i], 1) ;
    		delay (200);
  			digitalWrite (LED[i], 0) ;
    		delay (200);
  		}
	}
}
[/codesyntax]
You execute the command make to compile the program while the command make clean will remove the executable files. Here I
pi@raspberrypi ~/DVK512/LED/wiringPi $ make clean
rm led
pi@raspberrypi ~/DVK512/LED/wiringPi $ make
gcc -Wall led.c -o led -lwiringPi
pi@raspberrypi ~/DVK512/LED/wiringPi $ sudo ./led
You should now see the LEDs flashing
Links
You can pick one of these up for under $20
DVK512 # Raspberry Pi Model 2 B/B+/A+ Expansion/Evaluation Development Board with various interfaces