The TLV1543C, TLV1543I, and TLV1543M are CMOS 10-bit, switched-capacitor, successive-approximation, analog-to-digital converters. These devices have three inputs and a 3-state output [chip select (CS\), input-output clock (I/O CLOCK), address input (ADDRESS), and data output (DATA OUT)] that provide a direct 4-wire interface to the serial port of a host processor. The devices allow high-speed data transfers from the host.
In addition to a high-speed A/D converter and versatile control capability, these devices have an on-chip 14-channel multiplexer that can select any one of 11 analog inputs or any one of three internal self-test voltages. The sample-and-hold function is automatic. At the end of A/D conversion, the end-of-conversion (EOC) output goes high to indicate that conversion is complete. The converter incorporated in the devices features differential high-impedance reference inputs that facilitate ratiometric conversion, scaling, and isolation of analog circuitry from logic and supply noise. A switched-capacitor design allows low-error conversion over the full operating free-air temperature range.
The TLV1543C is characterized for operation from 0°C to 70°C. The TLV1543I is characterized for industrial temperature range of -40°C to 85°C. The TLV1543M is characterized for operation over the full military temperature range of –55°C to 125°C.
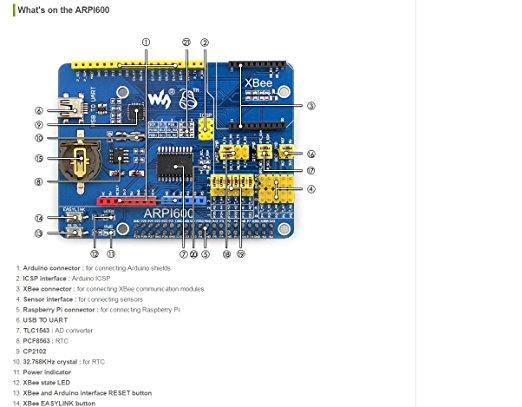
In this example we used an ARPI600 board which is pictured below
Code
This example reads AD0, I connected an LDR for testing
[codesyntax lang=”cpp”]
#include
#include

#define	Clock	27
#define	Address	28
#define	DataOut	29

unsigned int ADC_Read(unsigned char channel)
{
	unsigned int value;
	unsigned char i;
	unsigned char LSB = 0, MSB = 0;

	channel = channel << 4;
	for (i = 0; i < 4; i ++)
	{
		if(channel & 0x80)
			digitalWrite(Address,1);
		else
			digitalWrite(Address,0);
		digitalWrite(Clock ,1);
		digitalWrite(Clock ,0);
		channel = channel << 1;
	}
	for (i = 0; i < 6;i ++)
	{
		digitalWrite(Clock ,1);
		digitalWrite(Clock ,0);
	}

	delayMicroseconds(15);
	for (i = 0; i < 2; i ++)
	{
		digitalWrite(Clock ,1);
		MSB <<= 1;
		if (digitalRead(DataOut))
			MSB |= 0x1;
		digitalWrite(Clock ,0);
	}
	for (i = 0; i < 8; i ++)
	{
		digitalWrite(Clock ,1);
		LSB <<= 1;
		if (digitalRead(DataOut))
			LSB |= 0x1;
		digitalWrite(Clock ,0);
	}
	value = MSB;
	value <<= 8;
	value |= LSB;
	return value;
}


int main()
{
	if (wiringPiSetup() < 0)return 1 ;

	pinMode (DataOut,INPUT);
	pullUpDnControl(DataOut, PUD_UP);

	pinMode (Clock,OUTPUT);
	pinMode (Address,OUTPUT);


	while(1)
	{
  		printf("AD: %d \n",ADC_Read(0));
		delay(100);
  	}
}
[/codesyntax]
Links