


Getting an I2C device to work with your Raspberry PI requires a few steps, in this guide we show how to enable this.
First of all you have to start up the raspian config tool, you do this as follows
[codesyntax lang=”bash”]
sudo raspi-config
[/codesyntax]
Select ‘Advanced Options’ and then select the relevant option.
Enabling The I2C Port On Old Raspbian Distributions
The I2C ports need to be enabled in Raspbian before they can be used.
Edit the modules file by typing the following in the terminal window
[codesyntax lang=”bash”]
sudo nano /etc/modules
[/codesyntax]
Add these lines:
[codesyntax lang=”bash”]
i2c-bcm2708
i2c-dev
[/codesyntax]
Exit and save the file
Now you need to edit the modules blacklist file by typing the following in the terminal window. Note this file may be blank, in this case skip the step.
[codesyntax lang=”bash”]
sudo nano /etc/modprobe.d/raspi-blacklist.conf
[/codesyntax]
Add a ‘#’ character to this line so it commented out:
[codesyntax lang=”bash”]
#blacklist i2c-bcm2708
[/codesyntax]
Exit and save the file.
Finally install the required I2C utilities, again in the terminal type the following
[codesyntax lang=”bash”]
sudo apt-get install python-smbus
sudo apt-get install i2c-tools
[/codesyntax]
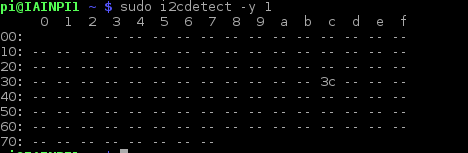
Type in “sudo reboot” to restart and I2C should be available. Connect an I2C device up and run the folllowing to test
[codesyntax lang=”bash”]
sudo i2cdetect -y 1
[/codesyntax]
On the older Raspberry Pi’s you hav eto use port 0
[codesyntax lang=”bash”]
sudo i2cdetect -y 0
[/codesyntax]
I connected an I2C SSD1306 OLED display, this is what I saw in the terminal window
i2cdetect output